JIM’S DOIN’S
I’ve been about as much of a homebody in recent weeks as it is possible for anyone to be. That has primarily meant sticking close to the machine where these words are being entered (who could have imagined, 60 years ago when I was in a similar situation in front of a manual typewriter acquiring what was arguably the most important piece of knowledge that came out of my high school years, never mind that I took a second year of typing because there was a comely lass in the class who had caught my eye, that the same arrangement of keyboard characters would produce such a dramatically different result?). Other than taking care of regular tasks such as a weekly column for the Smoky Mountain Times and quite a bit of background work on a book I am involved with which will celebrate 10 years of the existence of a grand entity in the heart of Alabama known as Alabama Black Belt Adventures Association, most of my day-to-day endeavor has involved reliving a key aspect of my youth—food and food traditions. I touch on that more below in an entry on some favorite cookbooks on the Smokies as well as this month’s recipes, and that’s the primary reason I’m once again running late.
It seems, as each month passes I become a bit more like what mountain folks call a tarapin (i. e., a terrapin or box turtle). I move in a bit more ponderous fashion and seem to take longer to get things done. Still, I plow along, have to reckon that my work ethic is still solid, and manage, albeit slowly, to get words on paper, garden and yard chores done, and as has been my habit all my life, do lots of reading.
Among recent publications carrying my byline are “Savoring Spring Tonics” in the April/May issue of Smoky Mountain Living, “Turning Waste into Wonder” (on utilizing the inedible parts of a wild turkey) in Wildlife in North Carolina for March/April, and a profile of turkey-hunting icon Henry Edwards Davis in the March/April issue of South Carolina Wildlife.
I travel very little these days, preferring to be close to Ann (I visit her daily at either dinner or supper and feed her), but I do intend to get up to Bristol, TN for the annual homecoming, known as Dogwood Festival, of my undergraduate alma mater, King University a bit later this month. I also hope to return toward month’s end for a bit of turkey chasing with my cherished friend Larry Proffitt.
Mostly though, it’s a time to stay at home, plant my garden (if we ever get enough dry weather to get anything in the ground, although I did finally get some tilling done), and maybe dream a bit about the good old days. With that in mind, here’s a look back to those innocent and wonderful days of youth.
SIMPLE CHILDHOOD PLEASURES FROM YESTERYEAR
Although I have a granddaughter of the appropriate age, I have no real idea of what today’s adolescents do for fun. However, I can guarantee two things. First, it costs a lot more (think i-pads, i-phones, Kindles, Wii and other electronic games and all sorts of gadgetry this poor soul, who still answers phone calls coming in via land lines, cannot even name) than my youthful pursuit of pleasure. Second, it doesn’t provide a bit more fun, and in all likelihood far less wholesome exercise, that the simple joys associated with my Smoky Mountain boyhood.
I’ve been thinking of those vanished days a lot in recent months. Part of that is nothing more than the manner in which nostalgia gains appeal as we gain age, but I’ve also been doing a great deal of “visiting” the times of the good old days in my mind. That’s largely connected with the two books, both outgrowths of many years of writing on the subject material and even more spent in living the lifestyle the works cover, I’ve been working on in feverish fashion. As I reported in last month’s newsletter, the first one “A Smokies Boyhood and Beyond: Mountain Musings and Memories,” is now with a publisher for a look-see. In case anyone should be interested, that usually involves a multi-step process: (1) In the case of academic presses, and that is the situation here, the in-house folks make an initial decision as to whether or not the manuscript has potential in their publishing plans. (2) If that decision is a positive one (in this instance it was), the manuscript is farmed out to two or three experts in the field for their input. (3) Provided that input is favorable and they feel the book has potential, suggestions for revisions may be made, recommendations on additions offered, and the like. (4) If all that works out, the author is offered a contract, negotiations ensue, and hopefully all works out for a formal deal. (5) Once under contract, the manuscript goes through a long process of being readied for press. With academic presses, that can stretch out as long as 18 to 24 months.
The second book, “Mountain Fixin’s: A Smokies Food Memoir,” is now pretty well finished. I need to do some fine tuning, possibly prune back the number of recipes from more than 170 to 150 or so, and give the whole shebang one last going over with a fine tooth comb. At that point I’ll reach out to a publisher (not the same one as is involved with “A Smokies Boyhood and Beyond”) and go from there. The point of all this, of course, is that endeavor connected with these books has had my rear view mirror operating in pretty much constant mode. With that being the case, I thought I’d share some fond recollections of things which provided simple fun during idle boyhood hours. I suspect some of you will remember similar pleasures along with being able to recall all sorts of other ones you enjoyed as a girl or boy.
One this warm look back a does is to provide an index to just how much things have changed over two generations. It is also a quiet suggestion that today’s youngsters may well be missing quite a bit of fun, not to mention a meaningful sense of connection to the good earth, because these vanishing joys are vanishing. That’s because most, though not all, involved an outdoor setting. I would also note, before getting down to specifics, that there is a sense of protectiveness associated with kids today I didn’t know. I was free to roam the fields and woods as I pleased, although I had darn well better be present and accounted for when supper time rolled around. Certainly there was no molly coddling, no “watch him every moment,” and no compulsiveness on the part of my parents which would have, in effect, prevented me from being a typical hillbilly boy.
Enough of that though. Here are some of the many things, mostly simple, mostly free, mostly without adult supervision, sometimes a bit dangerous, and always fun, which occupied many a wonderful spare hour in what I now realize was a singularly privileged boyhood. We may not have been rich in material things (or even anywhere near such elevated status), but my youthful lifestyle was rich beyond measure.
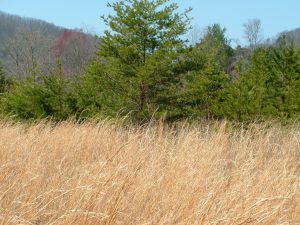
*Broom sedge sliding. From the first few hard frosts until the arrival of spring, any hillside laden with broom sedge can produce a world of fun. These days there seems to be less broom sedge, a plant which thrives in highly acidic soil in places such as poorly maintained pastures or recently abandoned land, but it was common as pig tracks in my youth. When dry, slender golden stalks of broom sedge become incredibly slick a “ride” down a hill laden with the plant provides a thrill comparable to being on a sled after a snow. In fact in some ways there’s even more pleasure, because the most commonly used device for such rides is a large piece of heavy-duty cardboard. There’s no steering mechanism and the ride basically involves holding on until you reached the bottom of the hill.

*Swinging on grape vines. Wild grapes of various types—‘possum grapes, fox grapes, and other varieties—can produce vines as thick as a man’s wrist and will sometimes grow all the way to the top of tall trees as they seek light. That tendency explains why you sometimes hear squirrel hunters talk about a late-season vine shaking expedition. Since bushytails often take advantage of a tangle of vines high up in a tree when building their nests, such hunting tactics can be quite productive.
Those stout, firmly attached vines also have offered many a mountain lad a ready-made swing. All that is required is to use a hatchet or perhaps a saw to cut a large vine close to the ground. Preferably the vine will be on a hillside where the swinger can take few steps uphill and launch into the air while clinging tightly to the vine. The result can be quite a ride, sometimes with the ground many feet below if the hillside is sufficiently steep. There’s an element of danger should the vine break, but what boy hasn’t been tempted in that regard?
*Skipping rocks. In my youth, at least, any son of the Smokies’ soil could consistently get a minimum of ten “skips” out of a suitably sized, flat river rock launched across the water so that the flat side hit the surface time and again. It was the most innocent of fun, lent itself to strong throwing arms for softball or baseball, and the banks of the Tuckaseigee and Little Tennessee rivers, not to mention larger creeks in the area, provided a limitless supply of ready-made throwing rocks. There’s a real art to skipping rocks, with key parts of the process being the ability to select a suitable rock and also throwing it in an appropriate manner so that it barely kisses the water on first contact before beginning a fast-paced series of skips, each one shorter than the one before.
*Dam building. If I had a hundred dollar bill for every rock I moved during my boyhood in connection with building dams, mine would be a fat bank account indeed. On a personal basis, most of these efforts involved three locales—Bryson Branch, Toot Hollow Branch, and lower Deep Creek. In the case of the two branches, both within easy walking distance of my home, it was actually possible for three or four boys working as a team to build a fairly impressive impoundment. That is to say, one which changed the depth of the branch from a few inches to as much as three feet. Of course such structures were doomed come the first heavy rain, but in the summertime they provided hours of innocent fun.
Obviously there was nothing new in such activities, because my father loved to reminisce about the time he and his younger brother, Hall, undertook a project on this kind at their home high up on Juneywhank Branch. All went well until the water level reached a point where it flooded a yellow jacket nest. Thinking back on Daddy’s description of how Uncle Hall yelled and fled when attacked by the angry yellow jackets still brings an involuntary smile to my face. “He was normally slow as cold molasses,” Daddy would say, “but had he run the bases in a baseball game the way he ran from those yellow jackets, he would have been some kind of star.”
As for Deep Creek, the idea was to make swimming holes a foot or so deeper, and with enough effort this could be accomplished. The two pools which received the most attention during my youth were the “Baptizing Hole” (also known as the Reeves Hole) adjacent to Deep Creek Baptist Church and the Weeks Hole a couple of hundred yards downstream. The latter was situated near the home of a good buddy, Gerald Medford, and was also a favorite fishing spot. Neither site is used for swimming today. Indeed there are signs at the former location expressly forbidding swimming, but there is another pool on upstream at the rear of Camp Living Water where juvenile construction efforts continue to this day. In the Park you’ll also find plenty of human engineering in the form of funnels to make tubing a bit faster and more exciting.
*Riding trees. This activity involved shinnying up slender trees until reaching a point where your weight caused them to bend and thereby allowed a “ride” back to the ground. Pines were most commonly used but I can remember riding poplars as well. It was great fun unless a sapling broke, then the trip to the ground came a lot faster than one had expected. I suspect that from time to time this pastime produced broken arms or legs, but it was sure was fun.
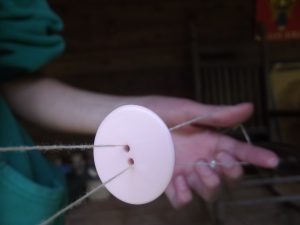
*Buzz Buttons (Whirligigs). These were a simple toy, easily made, which could give hours of pleasure. All that was required to make a buzz button was a length of string and a round button with at least two holes. The string was passed through the holes and then tied together. By flipping the button over a number of times to twist the string, then looping the string over a finger on each hand, it was possible to set the button to spinning madly by pulling the strings, releasing the pressure, and pulling again. The button hummed or buzzed when spinning. The string commonly used in my youth was black nylon fishing line, but kite string or something similar works just as well.
*Slingshots. Crafting a good, workable slingshot involved quite a bit of care and patience in both selection of material and actual construction. The first few I made were with assistance from either Daddy or Grandpa Joe, although eventually I got the knack of the process and fashioned some pretty good catapults on my own. The starting point was finding a dogwood fork of the right size and shape. It needed to be big enough to support the stress required to shoot a rock or ball bearing, have the right spread between the forks, and have two forks which branched out evenly. Once a fork had been selected, quite a bit of whittling ensued, and as anyone who has ever fooled with dogwood will readily attest, that was a chore. Dogwood is an exceptionally dense wood, so much so in fact that old-timers sometimes used wedges made from it to split firewood. Certainly whittling dogwood requires a keen knife along with lots of patience.
Once the prongs had been suitably shaped, there remained a bit of cutting at the top of each of them to attach the rubber which provided the impetus to throw or shoot a missile. Rubber from inner tubes was perfect for the job, having just the right amount of stretch. With the addition of a leather patch to hold your “ammunition” a boy was ready for business. Small stones along creeks and the river provided an endless supply of ammo, although for real accuracy a ball bearing or marble was much better. While I never achieved a comparable level of shooting prowess, I had two older cousins who could hit rabbits or birds with pretty impressive regularity.
*Bows and arrows. I spent a great deal of time making crude Native American weapons—blow guns and tomahawks as well as bows and arrows when I was a youngster. So did most of the other boys of my acquaintance. Our bows and arrows were anything but works of superb craftsmanship, but they were sufficiently functional to provide a great deal of fun. Hickory was the wood of choice for bows, and it took considerable effort to select a young hickory sapling a couple of inches in diameter, cut it and remove the bark, allow for a bit of curing (we never let it get anywhere near dry enough), and then use a pocket knife to shape it appropriately. Arrows tended to be made of dogwood, although that was not always the cast. Efforts did not extend to the addition of an arrowhead—fire-hardened tips to the arrows had to do. There were some rough efforts at fletching, but they were largely ineffective. No game animals were in danger from these creations, but they sure provided a lot of innocent fun.
*Whittling. Some of the activities already mentioned, including crafting of slingshots and bows and arrows, made extensive use of pocket knives. Similarly, all sorts of simple whittling for fun also took place. Maybe it was because the old men who frequented Loafer’s Glory down at the square during the warmer months were always whittling, or perhaps it was the pure pleasure of seeing a well-honed knife slice away a nice length of wood, but whatever the explanation boys and their knives devoted countless hours to blade on wood activities. My educated guess is that today you won’t find one boy in twenty who has done much whittling, and knives are forbidden on school grounds and frowned on elsewhere. Something went awry over the years, because to everyone of my generation and those before it, a pocket knife was a staunch companion, a wonderfully useful tool, and something you felt almost naked without.
*Flutter mills. I never was talented enough to create a really good flutter mill on my own, but with patient help from Grandpa Joe, using nothing but wood scraps, a section or two of a small dowel, and a nail or sturdy piece of wire, a delightful toy could be created. Properly placed in a small branch, the flutter mill turned endlessly and provided considerable pleasure as well as constant temptation to do a bit of adjustment to make it run (flutter) faster. A good one would also turn quite nicely in a stiff breeze.
Of all the many and varied do-it-yourself pleasures I recall from a Bryson City boyhood, probably none has “stuck” with me more than making cane fishing poles. Perhaps that’s because I’ve been an avid angler all my years, or possibly the simple satisfaction of crafting a supremely functional tool explains matters. Whatever the case, as boy and man I’ve had a mighty strong affinity for the humble cane pole. The fact that you can produce a quite serviceable piece of fishing equipment with a bit of gumption and minimal expense suggests that here’s a project well worth considering.
With that in mind, what follows is a step-by-step set of instructions for making your own fishing pole (or maybe a whole bunch of them).
*Cutting cane. There are patches of cane (or bamboo) growing wild all over the place. While there are canebrakes featuring a native variety scattered along banks of the Tuckasegee and Little Tennessee rivers, what you really want are poles from some of the larger domestic types of cane which have gone wild. Use a small saw to cut canes off close to the ground, being sure to saw through the middle of a joint. Next, use a sharp pocket knife to remove all the sprouts or shoots along the main body of the pole. Once that is done, you are ready for the next step.
*Curing cane. In order to get a perfectly straight pole, you want the cut, trimmed canes to dry out in appropriate fashion. The easiest way to make sure that happens is to tie the butt of the cane to an overhanging barn rafter or maybe a tree limb and use a bit of cord or wire to attach a weight to the small end. A cement-and-cinder building block makes an ideal weight. Let the weighted cane hang suspended in the air (clear of the ground so there is full tension on the pole) until it is well dried and turns from green to tan.
*Readying the pole. After the suspended cane has had a couple of months to cure and straighten, it is ready for the finishing touches. Shape the slender tip by carefully sawing through a joint. You probably will want to make that cut so that a couple of the uppermost joints are removed. Otherwise the tip will be too flexible, although if you intend to use the cane strictly for trout or panfish, a sensitive tip can be an advantage. Using some fine sandpaper, smooth all the rough spots at joints where limbs were removed prior to hanging the cane. Finally, if you want to get additional life out of your pole, applying a coat or two of clear varnish offers protection. The cane is now ready for the addition of hook, line and sinker.
*Finishing touches. Measure a length of monofilament which is two or three feet longer than your pole. That will be all you can handle when fishing. Attach the line to the tip of the cane just below where the joint was sawed through. Add a suitably sized hook and a split shot or two and you are in business—ready to go fishing.
Cane poles may be among the humblest of fishing tools, but in the proper hands they are wonderfully effective. Several times over the years I have seen trout fishermen, invariably old-timers, fishing with wet flies, nymphs or bait while using a cane pole. The technique they employ is what fly fishermen call “tight-lining” or Tenkara fishing, with the only real difference between fly rod and cane pole being the simplicity and inexpensiveness of the equipment.
Years ago I ran into a fellow on the Nantahala fishing this way, using multiple flies, and he was so effective that I simply stopped my dry fly fishing and watched him in action. He caught one trout after another, occasionally creeling a really nice one while turning smaller fish loose, until he had a limit of trout which would have averaged at least a foot in length.
Similarly, many times in my younger years I watched two real cane pole masters, George Monteith and Al Dorsey, work their fish-catching magic. George wade fished in the shoals of the Tuckasegee and Little Tennessee, along with sometimes going after trout in area creeks. Using bait he had dug or caught, and with a stringer tied to a loop in his bib overalls, he could catch a mess of fish in about as predictable a fashion as anyone I’ve ever witnessed.
Al’s approach was different. He fished from the bank or occasionally a flat-bottom boat, and he “set” his poles—usually a half dozen or so of them–rather than holding the cane in hand. Using forked props he had cut from limbs and stuck in the sand or mud of the shoreline, he spaced his poles out the way he wanted them and just relaxed while waiting for a bobber to bounce or a line to run. He was a catfishing wizard.
Handling a cane pole is simple. Just swing the line using the pole as a lever to get your bait into position. In still water it then becomes a matter of waiting for a cork to jump or go under, while in moving water matters are best addressed with the cane pole in hand. Whether fishing for bream, jigger poling for bass, watching a “spider rig” (several poles set around a boat like a spider’s web) for crappie, or tight-lining for trout, a trusty cane pole can be a fisherman’s best friend.
If you have children or grandchildren, why not involve them in making a few cane pole rigs? They’ll enjoy the sense of accomplishment, and once the crafting is done then it’s time to go fishing. Rest assured you’ll have at least as much fun as the youngster.
*********************************************************************************
SOME RUMINATIONS ON COOKING AND COOKBOOKS
As I have noted in a couple of previous newsletters, at present I’m deeply engrossed in completion of the manuscript of a book with the working title “Mountain Fixin’s: A Smokies Food Memoir.” It is pretty much what the subtitle suggests, a loving and longing look back to the foods and foodways of my youth—the cooks, family feasts, gardening, edibles from nature, outings to gather nuts or pick berries, traditional mountain ways of “putting up” food, and more. One aspect of the book, which I hope to finish this week (everything is actually written and I’m in the final proofing/re-writing stage), is a fairly comprehensive annotated bibliography of cookbooks focusing on my Smokies homeland. To my keen disappointment, although deep down I already knew it to be the case, there are surprisingly few useful cookbooks specifically oriented towards the Smokies. Instead, there are lots of cookbooks which use words like Appalachia, Appalachian, mountains, Blue Ridge, and even Smokies as a selling point rather than a matter of accuracy. I don’t have anything against northern Alabama, eastern Kentucky, the coal-mine country of West Virginia, or the mountainous regions of Virginia, but those areas aren’t the Smokies. They have plenty of cultural similarities, but by the same token there are lots of differences. Someone raised in the mining culture of Kentucky is appreciably different from a son or daughter of a hardscrabble farming family from the Smokies of yesteryear.
Since I’m ranting, I might add that the culture and people depicted in J. D. Vance’s Hillbilly Elegy are what, to borrow from a classic bluegrass song, I would call “rank strangers.” I think the book, for all that it is elegantly written, is in many senses a travesty. To put it bluntly—those ain’t my people and those ain’t my mountains. Forgive me for that aside, but I have encountered mention of the book so often (and some to the efforts written to counter Vance’s perspective are as bad, if not worse) it has become a burr in my britches.
Enough though—let’s get back to the matter of mountain cookery and cookbooks. In the bibliographical essay which will conclude “Mountain Fixin’s” I offer commentary, quite a bit of it somewhat acerbic, on several dozen putative “Smokies” or “mountain” cookbooks. However, there are several which I like—some of them a great deal—so I thought it might be useful to provide the authors and titles of several favorites. If you are looking for genuine Smokies vittles, prepared the old-fashioned way and without any of the high-falutin’ folderol of trained chefs and five-star restaurants, then I think you’ll find these titles appealing. Most of them also include considerable narrative material on the cooking traditions and folklore underlying the recipes.
Joseph E. Dabney, Smokehouse Ham, Spoon Bread, & Scuppernong Wine (1998).
Sidney Saylor Farr, More than Moonshine (1983).
Rose Houk, Food & Recipes of the Smokies (1996).
Walker Lambert, Kinfolks and Custard Pie (1988).
John Parris, Mountain Cooking (1978).
Willadeene Parton, All-Day singing & Dinner on the Ground (1997).
Gladys Trentham Russell, Call Me Hillbilly (1974).
Mark F. Sohn, Mountain Cooking: A Gathering of the Best Recipes from the Smokies and Blue Ridge
(1996) and Appalachian Home Cooking (2005).
********************************************************************************
THIS MONTH’S SPECIALS
Since I’ve already alluded to cooking and cookbooks, I decided to feature cookbooks as this month’s special offerings. There are three different selections—one strictly on venison; one on all types of wild game as well as nuts, berries, and other goodies from nature; and a third a more general work with fish and game recipes as well as others. Here are the details, and no PayPal on these. Just personal checks, cash, or money order. Postage is $3 extra (and that’s below my cost). If you are a S. C. resident, remember to add state sales tax at 7 percent.
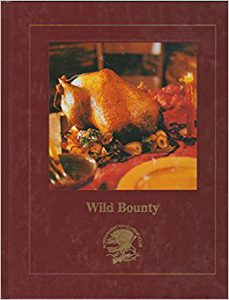
Wild Bounty. Beautifully illustrated with first-rate photos from both the wilds and set-up situations, this hardbound work won awards when it was published. The retail price is $20 but I’m reducing it to $12. All the recipes given below come from its pages.

The Complete Venison Cookbook. The first of two venison-only cookbooks Ann and I wrote, this one has well over 200 offerings and with few exceptions they are straightforward and easily prepared. We taste-tested and approved every recipe before it went into the cookbook. Paperbound, and the fact that tens of thousands of copies have sold suggests it has found favor with the eating public. Paperbound and only $10. Find one recipe you really like and it’s worth the price.
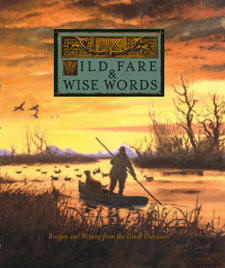
Wild Fare and Wise Words. A cookbook Ann and I edited (and I wrote all the narrative material) for the South Carolina Outdoor Press Association and a couple of non-profit groups, this one contains favorite recipes from outdoor writers in South Carolina and indeed all across the South. Hardbound. Retail price is $20 but I’m offering it at $10, a whopping 50 percent discount.
*******************************************************************************
SOME RECIPES FOR THE SEASON
WILD STRAWBERRY TRIFLE
It won’t be all that long until wild strawberries begin to ripen and what a treat they are. Izaak Walton sure knew what he was writing about in The Compleat Angler when he stated: “Doubtless God could have made a better berry but doubtless he never did.” I first ate a trifle (it used raspberries, not strawberries) when in Scotland a full 40 years ago. Talk about an eye-opening dessert! The basics of a trifle are simple—it’s a mixture of berries, cake, whipped cream, pudding, and, if you wish (and I do!), a bit of rum. Many recipes call for angel food cake, but for my part, and in keeping with Smokies-style foodstuffs, I think an old-fashioned pound cake made with plenty of eggs is better. Fill a trifle bowl (or any large bowl—it’s just that the clear ones made for trifles have a world of visual appeal) with successive layers of crumbled cake, vanilla pudding, sliced berries, and whipped cream until you reach the top or run out of ingredients. Finish with whipped cream at the top and decorate it with whole berries. Trifles are wonderful any time after they are made, but letting them “set” in the refrigerator for 12 hours or so allows berry juice to mingle with other ingredients in almost mystical fashion.
1 pound cake baked according to directions or as you normally prepare it
1 quart wild strawberries (cooked slightly with sugar and a dash or two of rum or Grand Marnier if desired)
3 large vanilla pudding mixes (enough for 6 cups of milk) mixed according to directions
2 large containers whipped topping (24 ounces total)
MOREL SOUP
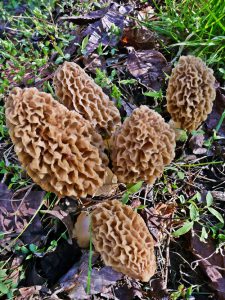
Morel mushrooms are a great spring delicacy, and there are a number of fail-safe methods for preparing them. In each case, first soak the mushrooms in salt water and then clean thoroughly. It is best to slice them in half before doing this, because quite frequently insects find the hollow interior a welcoming abode. After cleaning, gently dab dry with a clean cloth or paper towels. Introduce the mushroom pieces to simmering butter in a pan, sautéing until they begin to brown. I find it difficult to resist eating them right from the pan, and you certainly want to serve them immediately while piping hot.
1 pound of fresh morels, cleaned and sliced
1-2 tablespoons lemon juice
1 large sweet onion, chopped
3 tablespoons butter (do not substitute margarine)
2 tablespoons all-purpose flour
4 cups whole milk
3 teaspoons chicken bouillon granules
½ teaspoon salt
1/8 teaspoon black pepper
Clean mushrooms and sprinkle with the lemon juice. Sauté in a saucepan with onion and butter until translucent and tender. Dust with flour and stir thoroughly. Gradually add milk, bouillon, salt and pepper. Bring to a rolling boil, stirring vigorously as you do so, and continue for two minutes. Reduce heat and simmer 10-15 minutes. If you like the taste of thyme, add a half teaspoon to the recipe, but keep in mind that morels have a delicate flavor.
TURKEY PIE
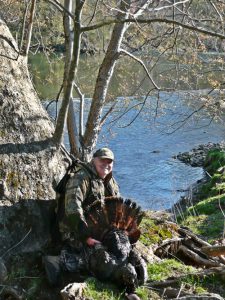
If you are fortunate enough to take a turkey or two this spring here’s a dandy way to use some of the leavings. Right now it is difficult for me to get in the turkey-hunting mood since I’m looking out the window at about two inches of “poor man’s fertilizer” (snow), but the chilly weather sure does whet one’s appetite. I reckon the unseasonable snowfall is sort of God’s offering, one day late, for April’s Fool.
6 tablespoons butter
6 tablespoons all-purpose flour
¼ to ½ teaspoon freshly ground black pepper
2 cups homemade turkey broth (or purchased chicken broth)
2/3 cup half-and-half or cream
2 cups cooked wild turkey, chopped
Crust for a two-crust pie
Add flour and seasonings to butter. Cook for one minute in a large skillet, stirring constantly. Add broth and half-and-half and cook slowly until thickened. Add turkey, mix in, and pour into pastry-lined pan. Top with pastry and pinch edges together cutting in a few slits. Bake at 400 degrees for 35-45 minutes or until pastry is nicely browned. NOTE: This is a good recipe for dark meat from a wild turkey. That of a mature gobbler is quite tough.
BLACK WALNUT CRUSTED TURKEY
Black walnuts are to me something of a miracle when it comes to taste treats. We normally think of them with cookies or possibly one of my all-time favorites, a black walnut cake, and there are few things finer than a churn of home-made black walnut ice cream on a hot summer day. But walnut meats can also do yeoman duty outside the dessert arena, and here’s a case in point with turkey followed but a second one featuring nut meats in an unusual salad dressing.
1 pound wild turkey breast cutlets, pounded well with a meat mallet
½ cup oil-and-vinegar salad dressing
1/3 cup finely chopped black walnut meats
½ cup fresh bread crumbs
1 tablespoon finely chopped chives
1 tablespoon butter
2 tablespoons olive oil
Pound turkey breast cutlets with a meat hammer or the base of a kitchen knife handle then place in a quart plastic bag, pour in the salad dressing, and marinate overnight or for at least six hours.
Place black walnuts and bread crumbs in a blender and process until fine. Add chives.
In a large skillet, melt butter and add olive oil over medium-high heat. Drain cutlets and dip into black walnut-bread crumb mix, pressing to coat if necessary.
Place the coated cutlets in the skillet and reduce heat to medium. Cook for 4 to 6 minutes per side until golden brown and the inside is no longer pink. Serve immediately.
BLACK WALNUT SALAD DRESSING
¼ cup chopped black walnuts
¼ cup chopped English walnuts
Salt to taste
¼ cup vegetable oil
2 tablespoons wine vinegar
4 teaspoons freshly squeezed lemon juice
Grated peel of one lemon
Freshly ground black pepper
Toast nuts and cool. Briefly chop nuts in blender with salt. Do not chop nuts too finely; chunks should remain. Add oil, vinegar, lemon juice, lemon peel, and pepper; pulse to blend. Taste to adjust flavors. Wonderful over a mixed greens salad, sliced tomatoes, or an avocado half. TIP: If you are especially partial to the rich, nutty flavor of black walnuts, double up on them and leave the English walnuts out.